In this postal service you'll learn how to remove the background from images in PowerPoint (as pictured below) using 2 different tools.
And the reason that knowing how to apply these tools is so important, is they profoundly increase the range of ways you tin can employ pictures in your PowerPoint presentations.
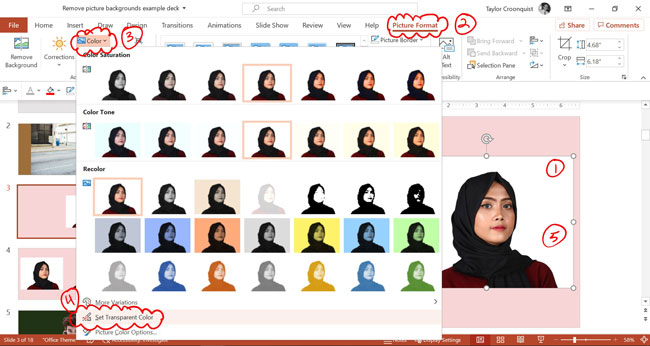
Tool #1: The Set Transparent Color tool.
This technique works best for pictures with 100% solid backgrounds (similar the white backgrounds you find in stock photos). If your background is non 100% solid, you lot'll have to employ the Remove Background Tool instead.
Tool #2: The Remove Background tool.
This tool works all-time for removing complicated backgrounds from photos and images that don't accept a 100% solid background. Also, this technique gives you lot the virtually flexibility when deciding what parts of the background yous remove.
After removing your background, you lot tin can so compress your images in PowerPoint to reduce your PowerPoint file size. To larn how to practice this, read our compression guide here.
Note: If yous are using a flick or image you found online, make sure yous properly cite the creator or website you downloaded it from. To acquire how to properly cite pictures and websites in your presentations, read our citing guide here.
Notation: These background removal techniques DO NOT piece of work with vector graphic files such every bit svgs, wms and DRWs.
If you have one of these vector graphic files, you'll first need to convert it to the JPEG or PNG file format to follow along.
You can alternatively make your image groundwork transparent (instead of removing information technology). For details,see our guide here.
The fastest fashion to remove an image background is to use the Set Transparent color tool. The only catch is this merely works for removing solid colors, like white backgrounds.
To remove a white background from an epitome in PowerPoint, simply:
- Insertand select a picture on your slide
- Navigate to theMotion picture Tools Format Tab
- Open theColordrib down
- Select theSet Transparent Color tool (your cursor becomes a little pen with an arrow)
- Clickon the color you lot want to remove from your groundwork
Clicking the colour, PowerPoint turns that solid colour transparent throughout your unabridged picture. In this case, the white groundwork is removed.
This technique works best when you have a adequately straightforward (and simple) groundwork every bit pictured above. If your background is more complicated, you'll need to utilize the Remove Background Tool instead
TheSet Transparent Color tool works super well if you take stock photos with solid colored backgrounds.
You will observe these types of backgrounds on a lot of the stock photos yous find online. For example, y'all can find these kinds of free stock photos on www.pexels.com.
Only keep in mind that while thePrepare Transparent Colour Tool is amazing, it does have limitations.
Example #ane: This technique does not work well if your groundwork and prototype are too similar in color.
Detect that because the entire image beneath is basically the aforementioned color, the woman's face up is removed with the background.
Example #2: This technique does not well with gradient colour backgrounds equally yous can see below.
Because the Fix Transparent Color tool only removes a single color, the majority of the gradient is non effected.
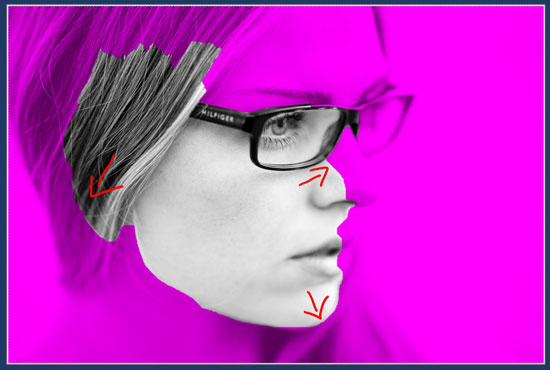
Instance #3: This technique does not piece of work well with minute details like strands of hair or article of clothing. This likewise includes pixels around people'southward hands, as pictured below.
For any of these types of scenarios, you'll want to utilize the Remove Background tool instead.
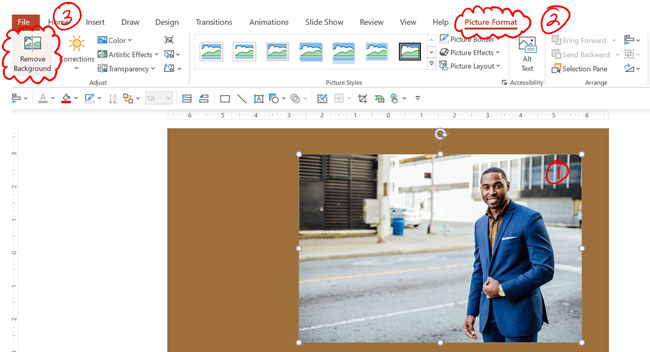
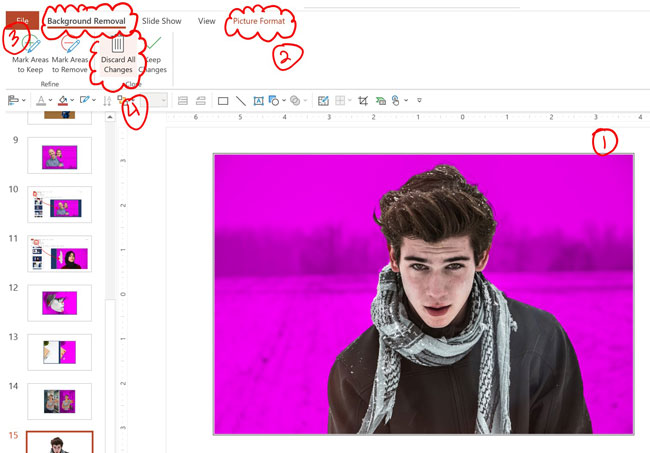
To remove a background from an image, merely:
- Selectthe paradigm on your slide
- Navigate to thePicture Tools Formattab
- Select theRemove Background command
- Conformyour removal settings (described below)
- SelectGo on Changes
Clicking Keep Changes, the magenta groundwork portion of your image will be removed from your photo, as pictured beneath.
Adjusting what gets removed in your Image
When you starting time select theRemove Background command, PowerPoint takes a guess at what you desire to remove.
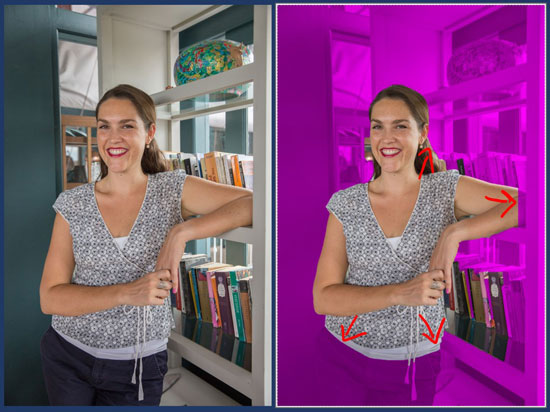
In the motion-picture show below, the pink (magenta) area is image background that PowerPoint is guessing that I want to remove.
While PowerPoint normally does a pretty good job at guessing, it doesn't always get information technology right.
Notice in the picture in a higher place that the woman's artillery are magenta ,every bit is the lesser part of the man's torso. Because those are similar to the groundwork image, PowerPoint is guessing that those should be removed too.
When this happens to you lot, all yous need to practice is adjust the background removal options to specify what you lot desire to keep and remove in your moving-picture show
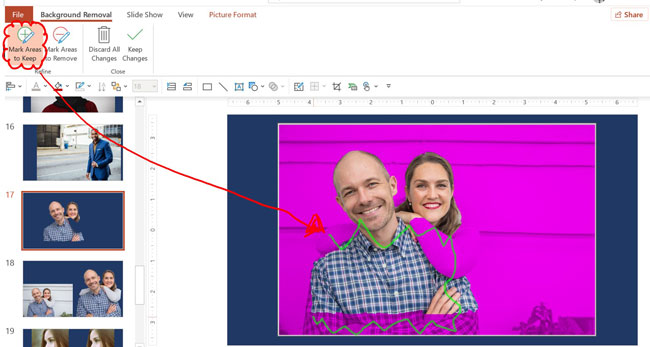
If PowerPoint doesn't guess correctly, you can simply mark the areas you want to keep. To practise that, but:
- SelectMarking Areas to Keep
- Click and depict over the parts of your photo y'all want to continue (a dark-green marking)
- ClickProceed Changes
Selecting continue changes, PowerPoint readjusts what parts of your prototype groundwork are removed. Yous might need to mark areas to keep a few times before you lot finally get it correct
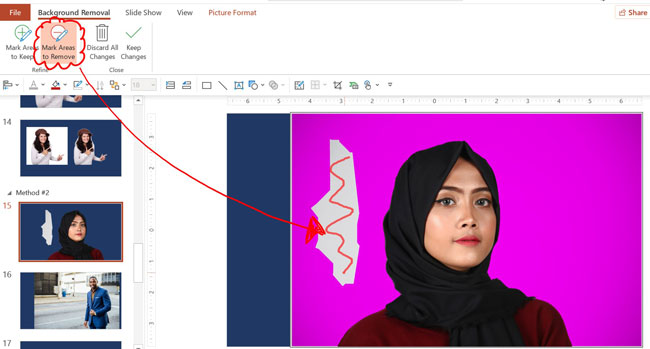
If PowerPoint guesses incorrectly, you can also marker areas to remove from your photograph. To do that, simply:
- SelectMark Areas to Remove
- Click and draw over the parts of your photo you want to keep in Red
- Click Keep Changes
Selecting go along changes, PowerPoint volition readjust what parts of your background image are removed. Proceed in mind that depending on the complexity of your prototype, you might need to do this a few times to get information technology correct.
While the remove groundwork tool will work for nearly backgrounds you lot desire to remove, at that place are some limitations.
Limitation #1: if your motion picture is too similar, even with the mark areas to keep and mark areas to remove, it can be extremely difficult to remove all of the right pieces. Precipitous crisp photos work best.
Limitation #two: Small-scale details tin can exist hard to remove the groundwork around (like the background effectually strands of hair, folder rings, etc.)
Limitation #iii: If the background is too complex or a gradient color, removing the background can besides be very challenging.
By default, when PowerPoint removes the background from your image, it merely hides it from you lot.
That means that at anytime you lot can always revert dorsum to your original image or change your mind about what parts of the image background you want to remove.
To undo your background removal (or start over) just:
- Select your photo with the removed background
- Navigate to theMotion picture Tools Format Tab
- ClickRemove Background
- Adjust your settings (orDiscard All Changes)
Clicking remove background, yous will meet that your background edits return. This allows y'all to readjust what parts of your image groundwork you desire to proceed or remove.
The only time that you lot will not be able to move dorsum to your original image is if you lot compress your images. To learn more near your image pinch options to relieve file size,come across our blog post here.
In summary, while theSet Transparent Color tool is the fastest way to remove your image backgrounds, it only works some of the time.
That's why I recommend that yous familiarize yourself with theRemove Background Tool. If you work with lots of image, this volition become your go-to tool for removing backgrounds in PowerPoint.
If either of these methods doesn't work, you can movement over to Photoshop for more precision.
While PowerPoint's moving-picture show editing features are GREAT… it's hard to beat a dedicated picture editing plan like Photoshop.
To learn more about our PowerPoint preparation courses and other presentation resource,visit usa hither.


In addition to the UK49s lunchtime results, there is also a tea time lottery draw that happens.
ReplyDeleteThe UK49s Results tea time lottery takes place at approximately 12:49 pm GMT every day.
ReplyDelete